Fast Robots: Lab 1

Fast Robots Lab 1

Arduino IDEBluetoothJupyter Notebooks

Introduction to Using Artemis Nano

This lab is to serve as an introduction to using the Arduino IDE and Jupyter notebooks to communicate with the Artemis Nano microcontroller. We look at a few peripherals and communicate with the board via bluetooth and serial communication.

Plugging it in

Hooking Up The Board

Before we begin, we must have a method to interact with the board. To do this, we use the Arduino IDE, and add the Sparkfun Appollo3 board support package via this link. After installing the board support package, we can select the Sparkfun Artemis Nano as our target board, plug in the board, and upload code to it.

Simplest Example

Blinking the Board LED

Running the built-in Arduino example "Blink" causes the board's LED to blink.

Reading Values

Serial Communication

Running the built-in Apollo3 example "Serial" allows us to read and write serial values from the board. For this example, it counts up and then echos what we send to it. The baudrate is set to 115200.

Fast Robots Lab 1 Serial Capture

Analog Read

Temperature Sensor

Running the built-in Apollo3 example "Analog Read" allows us to read from the onboard temperature sensor. For this example, as I put my finger on the board, the temperature reading increases from ~13000 to ~65000.

Talking into the mic

Microphone Sensor

Running the built-in PDM example "Microphone Output" allows us to read from the onboard Pulse Density Microphone. For this example, as I make a light noise into the microphone, the pitch reading increases from ~750 to ~9000.

5000-Level Task

Note Detector

For the final task, I created a simple note detector that prints the note that is detected by the microphone by monitoring the pitch from the microphone. The note ranges are as follows:
C5 (523Hz): 525-527Hz
B4 (494Hz): 491-494Hz
D5 (587Hz): 582-584Hz

ui32LoudestFrequency = (sampleFreq * ui32MaxIndex) / pdmDataBufferSize;

if (ui32LoudestFrequency <= 527 && ui32LoudestFrequency >= 525)
{
	Serial.printf("Detecting an C5 (523Hz)\n");
}
if (ui32LoudestFrequency <= 494 && ui32LoudestFrequency >= 491)
{
	Serial.printf("Detecting an B4 (494Hz)\n");
}
if (ui32LoudestFrequency <= 584 && ui32LoudestFrequency >= 582)
{
	Serial.printf("Detecting an D5 (587Hz)\n");
}

Start of Lab1B

Lab Setup

For the start of Lab1B, we set up the bluetooth module to communicate with the Artemis Nano. We use the ArduinoBLE library to advertise the board as a bluetooth device, and create a custom service and characteristic to send and receive data. We can then connect to the board via bluetooth from a Jupyter notebook using the Bleak library.

To setup the Python module, we setup a virtual environment and install the Bleak, asyncio, jupyterlab, and other dependencies libraries via pip using the commands below:

python3 -m venv FastRobots_ble
.\FastRobots_ble\Scripts\activate
pip install numpy pyyaml colorama nest_asyncio bleak jupyterlab

We were given a sample Jupyter notebook and arduino sketch to connect to the board via bluetooth and send/receive messages (downloadable here). However, to connect to the board, we must first find the MAC address of the board by running the "ble_arduino.ino" which prints the MAC address to the serial monitor as shown below. We can then input this MAC address into the connections.yaml file which is used by our Python script to connect.

Fast Robots Lab 1 Serial Capture

We also need to generate a UUID for our custom bluetooth service and characteristic. This can be done by importing the UUID module in Python and generating a random UUID using the command below:

import uuid
print(uuid.uuid4())

After generating the UUIDs, we can input them into both the Arduino sketch and the connections.yaml file. Which allows us to connect to the board via bluetooth and send/receive messages. The codebase for both the Arduino sketch and Jupyter notebook already contains helper functions to make sending and receiving messages easier. Such as "send_command" and "recieve_string/float/int" in the Python notebook which lets us send commands, which are then processed by ble_arduino.ino, and read the data from the board.

Echo Echo Echo Echo....

First Command

We edited the provided Arduino sketch to add a new command "Echo" which echos back any string sent to it. In this case we tak on "Robot says -> " before the echoed string to differentiate it from other messages.

case ECHO:

char char_arr[MAX_MSG_SIZE];

// Extract the next value from the command string as a character array
success = robot_cmd.get_next_value(char_arr);
if (!success)
	return;

tx_estring_value.clear();
tx_estring_value.append("Robot Says -> ");
tx_estring_value.append(char_arr);
tx_characteristic_string.writeValue(tx_estring_value.c_str());

Serial.print("Sent back: ");
Serial.println(tx_estring_value.c_str());

break;
Fast Robots Lab 1 Serial Capture Fast Robots Lab 1 Jupyter Capture

Float Float Float

Send Three Floats

We added another command which takes three floats and prints them back to the serial monitor. This command extracts three float values from the command string with the "|" acting as a delimiter between values.

case SEND_THREE_FLOATS:
float float_a, float_b, float_c;

// Extract the next value from the command string as an integer
success = robot_cmd.get_next_value(float_a);
if (!success)
	return;

// Extract the next value from the command string as an integer
success = robot_cmd.get_next_value(float_b);
if (!success)
	return;

// Extract the next value from the command string as an integer
success = robot_cmd.get_next_value(float_c);
if (!success)
	return;

Serial.print("Three floats: ");
Serial.print(float_a);
Serial.print(", ");
Serial.print(float_b);
Serial.print(", ");
Serial.println(float_c);

break;
Fast Robots Lab 1 Serial Capture Fast Robots Lab 1 Jupyter Capture

What Time Is It?

Get Time Millis

We added another command which outputs the current time in milliseconds since the board started. The command takes an argument of 0,1,2 which corresponds to sending out one value, appending values to an array, or also monnitoring the temperature. The second and third options are used in later tasks below.

case GET_TIME_MILLIS:
{
// list or no list
// If send_bool == 0 dont append to array, if send_bool == 1 append to array and dont send
int send_bool;
robot_cmd.get_next_value(send_bool);
if (!success)
{
	return;
}
			
// No Character sent - send back current time
int timeSinceStart = millis();
if (send_bool == 0)
{
	tx_estring_value.clear();
	tx_estring_value.append("T:");
	tx_estring_value.append(timeSinceStart);
	tx_characteristic_string.writeValue(tx_estring_value.c_str());

	return;
}
Fast Robots Lab 1 Serial Capture

Got It

Notification Handler

To immediately process the data when it is received from the board, we set up a notification handler which parses the time string and prints just the millisecond time to the console as soon as it is received.

def notification_handler(characteristic, data):
    # need to decode raw data byte array
    decoded = ble.bytearray_to_string(data[2:])
    print(decoded)
ble.start_notify(ble.uuid['RX_STRING'], notification_handler)
Fast Robots Lab 1 Serial Capture

Got It Got It Got It....

Notification Handler Loop

To see how fast we can get the time values, we set up a loop to continuously send the get time command.

for i in range(15):
    ble.send_command(CMD.GET_TIME_MILLIS, "0")
Fast Robots Lab 1 Serial Capture

As seen above, we are able to get time values at around 180 ms intervals. Since we are sending an integer, this is about 4 Bytes of data, but the Arduino also sends "T:" before the integer. This means we are sending about 6 Bytes of data every 180 ms, which is about 33.33 Bytes per second.

Faster Got It....

Batch Sending

To send values faster, we can use the array sending option of the get time command to send multiple values at once. We send the get time command with the argument of 1 to append values to an array on the Arduino side, and then use a new command "SEND_TIME_DATA" to send the entire array at once.

if (send_bool == 1)
{
	while (timeStampArrayIndex < MAX_CAPACITY) {
		timeSinceStart = millis();
		timeStampArray[timeStampArrayIndex] = timeSinceStart;
		timeStampArrayIndex++;
	}
}
case SEND_TIME_DATA:
{
	int i = 0;
	for (i=0; i < timeStampArrayIndex; i++) {
		tx_estring_value.clear();
		tx_estring_value.append("T:");
		tx_estring_value.append(timeStampArray[i]);
		tx_characteristic_string.writeValue(tx_estring_value.c_str());
	}

	// reset time array
	memset(timeStampArray, 0, sizeof(timeStampArray));
	timeStampArrayIndex = 0;
	
	break;
}
Fast Robots Lab 1 Serial Capture

In the Python code above, we run our commands, and print out the time reading from the beginning and end of the batch (starts at index 15 because I ran the previous loop test first). Our MAX_CAPACITY is set to 1000. We can see that we are able to get 1000 time readings in about 21 milliseconds, giving 6000B/21ms = ~285 kilobytes per second. This is a significant improvement over the previous method of sending one value at a time.

Temperature and Time

Get Temp Readings

We then implement a feature to monitor the temperature while getting time readings. We use the array sending option of the get time command to send values rapidly in the form "T:[InsertTime]D:[InsertTemp]" where T is the time in milliseconds and D is the temperature reading in fahrenheit. To command the board to start appending values to the array, we send the get time command with the argument of 2. To send the entire array at once, we create a new command "GET_TEMP_READINGS".

if (send_bool == 2)
	{
	float temp_f;
	while (timeStampArrayIndex < MAX_CAPACITY) {
		timeSinceStart = millis();
		temp_f = getTempDegF();
		timeStampArray[timeStampArrayIndex] = timeSinceStart;
		tempReadingArray[timeStampArrayIndex] = temp_f;
		timeStampArrayIndex++;
	}
	}
case GET_TEMP_READINGS:
{
	int i = 0;
	for (i=0; i < timeStampArrayIndex; i++) {
		tx_estring_value.clear();
		tx_estring_value.append("T:");
		tx_estring_value.append(timeStampArray[i]);
		tx_estring_value.append("D:");
		tx_estring_value.append(tempReadingArray[i]);
		tx_characteristic_string.writeValue(tx_estring_value.c_str());
	}

	// reset time array
	memset(timeStampArray, 0, sizeof(timeStampArray));
	timeStampArrayIndex = 0;

	// reset temp array
	memset(tempReadingArray, 0, sizeof(tempReadingArray));
	tempReadingArrayIndex = 0;
	
	break;
}

Since we change the format of the recieved data on the Python side, we need to update the notification handler accordingly.

timeStampArray = []
tempArray = []
def notification_handler(characteristic, data):
    # need to decode raw data byte array
    decoded = ble.bytearray_to_string(data)
    # in form: decoded = 'T:123D:456' (time, degree)
    decoded = decoded.split(':')
    timeStr = decoded[1][:-1]
    degStr = decoded[2]
    # print(decoded)
    tempArray.append(degStr)
    timeStampArray.append(timeStr)
ble.start_notify(ble.uuid['RX_STRING'], notification_handler)

ble.send_command(CMD.GET_TIME_MILLIS, "2")
ble.send_command(CMD.GET_TEMP_READINGS, "")

for t, d in zip(timeStampArray[:1000:100], tempArray[:1000:100]):
    print(f'Time is: {t}, Current Temp (F) is: {d}')
Fast Robots Lab 1 Serial Capture

Comparisons

Data Rate Transfer Speeds

The advantages and disadvantages of each method are summarized below:

Single Value Transfer:
• Simple to implement and understand.
• Lower data transfer rates due to overhead of individual transmissions since Python has to send a command, then the board has to process that command and send the data back before new data can be received. This means that we are heavily bottlenecked by communication latency over Bluetooth.
• Suitable for applications where data is needed without high precision or in small amounts, or when needed immediately.
• Had a data transfer rate of ~33.33 Bytes/second in our implementation.

Batch Value Transfer:
• More complex to implement due to the need for buffering and managing larger data sets.
• We have to store the entire batch of data in memory on the microcontroller before sending, which could be a limitation for very large data sets.
• Significantly higher data transfer rates as multiple values are sent in a single transmission, reducing overhead, since only two commands need to be sent back and forth to save and then transfer all the data.
• Ideal for applications requiring highly precise data acquisition or large data sets.
• Had a data transfer rate of ~285K Bytes/second in our implementation.

If we use the second method of batch value transfer, we can achieve much higher data transfer rates. In the case of sending time and temperature readings, we have 12 Bytes of data being sent per reading (T:xxxxD:xxx). Since the Artemis board has 384kB of RAM, we can store a maximum of about 32,000 readings in memory at once (384,000B / 12B per reading = 32,000 readings). This means that we can send a batch of 32,000 readings in one go without running out of memory.

5000-Level Task

Data Rate Versus Message Size

To test how message size affects data transfer rate, I sent 100 messages of varying sizes from 1 Byte to 147 Bytes. The maximum size we can send is 147 Bytes since the maximum string size we can send over is 150 Bytes, and we have to reserve 3 Bytes for overhead. The command used to send the messages is "TIMED_ECHO" which echos back the sent string without any additional text. The time taken between sending and recieving the message is recorded to calculate the data transfer rate via a notification handler. For each message size from 1 to 147 Bytes, I sent 100 messages and recorded the response times. The results and code snippets are shown in the plot below.

case TIMED_ECHO:
{
	// Echo's back to the python notebook without printing'
	char char_arr[MAX_MSG_SIZE];

	// Extract the next value from the command string as a character array
	success = robot_cmd.get_next_value(char_arr);
	if (!success)
		return;

	tx_estring_value.clear();
	tx_estring_value.append(char_arr);
	tx_characteristic_string.writeValue(tx_estring_value.c_str());

	break;
}
respTimes = []
sentTime = 0
mesgCount = 0
def notification_handler(characteristic, data):
    global responseInFlight, mesgCount
    mesgCount += 1
    respTimes.append(time.time() - sentTime)
ble.start_notify(ble.uuid['RX_STRING'], notification_handler)

respMap = {}
for i in range(1, 148):
    testStr = 'a'*i
    respTimes = []
    mesgCount = 0
    # send 100 messages
    numMsg = 100
    for j in range(numMsg):
        responseInFlight = True
        sentTime = time.time()
        ble.send_command(CMD.TIMED_ECHO, testStr)
        
    ble.sleep(0.1) # give the controller time to process incoming messages
    
    respMap[i] = np.array(respTimes)
Fast Robots Lab 1 Data Rate vs Message Size Fast Robots Lab 1 Average Response Time vs Message Size

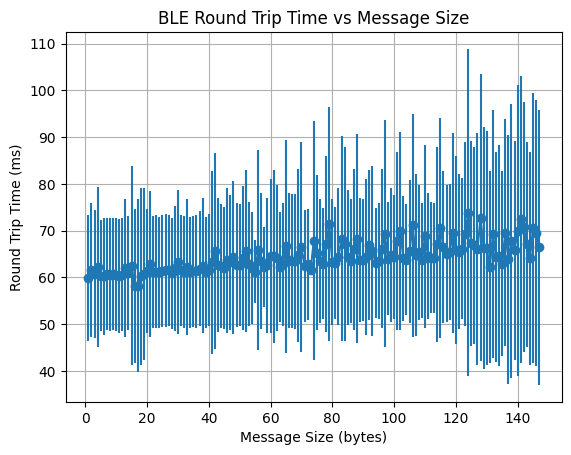
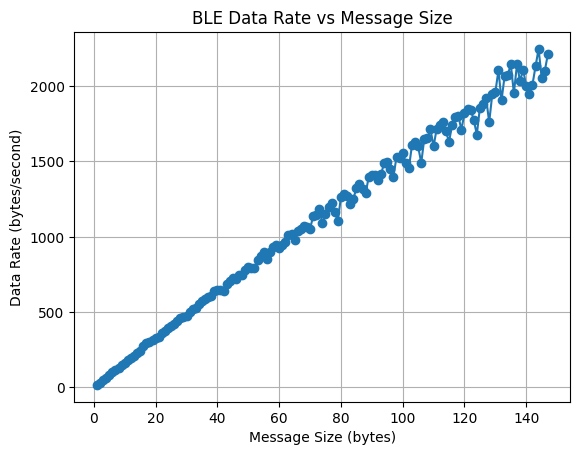
The plot on the left shows the average round trip time distributions for different message sizes with error bars for standard deviation, while the plot on the right shows the data rate (Bytes/second) versus message size.

From these plots we can see that as the message size increases, the average response time also increases linearly, albeit slightly. This is expected as larger messages take longer to transmit over Bluetooth. However, the increase in response time is relatively small compared to the increase in message size. As a result, the data rate (Bytes/second) also increases with message size. For example, the data rate for 5 byte messages is 82.79 Bytes/second, while for 147 byte messages it is 1,820.11 Bytes/second. The variability in response times also increases with message size, likely due to the increased likelihood of interference and retransmissions for larger packets. Smaller messages seem to introduce a large amount of overhead since it has to send a packet over bluetooth for each message, leading to lower data rates. Overall, these results suggest that for applications requiring high data throughput, it is more efficient to send larger messages rather than many small messages since each large message has the same overhead but sends more real data.

5000-Level Task Part 2

Reliability Test

By modifying the GET_TIME_MILLIS command to send 1000 time readings in a loop without waiting for any commands from Python, we can test the reliability of the data transfer by checking how many messages are lost during transmission. In this case, we send 1000 time readings as fast as possible and record how many readings are received on the Python side. The code snippet for sending the readings is shown below.

if (send_bool == 0)
{
	int timeSinceStart = millis();
	int i = 0;
	for (i=0; i < 1000; i++)
	{
	timeSinceStart = millis();
	tx_estring_value.clear();
	tx_estring_value.append("T:");
	tx_estring_value.append(timeSinceStart);
	tx_characteristic_string.writeValue(tx_estring_value.c_str());
	}

	return;
}

On the python side we used the notification handler from the part above to record how many readings were received. After running the test multiple times, we found that we were able to receive all 1000 readings consistently without any loss. This indicates that the data transfer is reliable for this use case even when sending a large number of messages in quick succession. However, it did take some time for all of the messages to come through.

Finishing Up

Discussion

This lab provided valuable hands-on experience with Bluetooth communication between a microcontroller and a host computer which will be useful for future robotics projects where we won't have direct wired connections. It also showed different methods of data transfer and their trade-offs in terms of speed and reliability. Implementing both single value and batch value transfer methods highlighted the importance of choosing the right approach based on application requirements.

ChatGPT was used to help format parts of this website and report as well as debug some issues with the reliability test code. Aiden McNay's website was used as a reference for the data rate vs message size task and graphs. I also worked closely with Ananya Jajodia and Shao Stassen for this lab.